RVault Box
A crowded gun safe can become difficult to inspect, clean, and manage safely. How to organize a gun safe for maximum capacity begins with planning, not stacking. The goal is to use available space while keeping every firearm secure, identifiable, and easy to remove without disturbing others. A well-organized interior should also protect firearms from scratches, moisture, and unnecessary pressure.
Before arranging anything, confirm that each firearm is unloaded and follow the manufacturer’s safety instructions. Local storage requirements may also apply, especially where children or other unauthorized people could access the safe. Remove loose packaging, damaged cases, and duplicate accessories that consume valuable room. Keep essential items in labeled containers, and record the contents in a simple inventory. Keep it current.
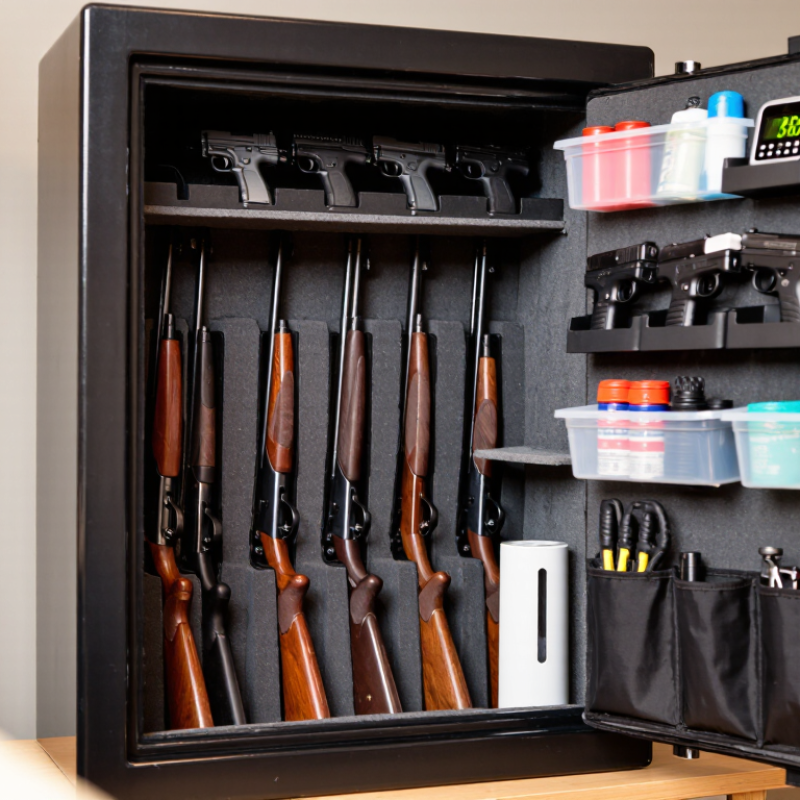
Measure the safe’s interior shelves, door pockets, and vertical clearance. Long guns may fit better in alternating directions, while padded separators can prevent contact between stocks and barrels. Handguns should remain in secured holders rather than resting loosely on shelves. Store ammunition separately when required by local guidance, and never block the locking mechanism or emergency access features. A small hygrometer can help monitor humidity, while a suitable dehumidifying device may reduce corrosion risk.
Capacity is not the only measure of success. A tightly packed safe may look efficient but create poor access and hidden damage. This is where judgment matters. Recheck the layout after a week of normal use. Some arrangements seem perfect initially. Then small problems appear. Adjust the spacing, labels, and accessory storage until the system remains safe, visible, and practical. When uncertainty remains, consult a qualified safe technician or firearms-storage professional.
Inventory every firearm by overall length before arranging the safe. Measure from the stock or grip to the muzzle, including attached accessories. Record each measurement in a simple table. A 2023 RAND Corporation review found that secure-storage practices vary widely among firearm owners, so organization should support both access control and accurate accountability.
Compare your measurements with the safe’s rated capacity, but treat that number cautiously. Capacity ratings often assume compact, similarly sized firearms with minimal accessories. A safe rated for 30 long guns may hold far fewer when several exceed 45 inches. Leave room around shelving, hinges, and locking hardware. Crowding can create pressure, scratches, and difficult retrieval. I have found that a paper layout exposes mistakes faster than rearranging heavy equipment. Still, measurements can change after accessories are added.
Tips: Group firearms by length, then place the tallest items at the rear or sides. Keep shorter items toward the front. Use removable dividers to prevent leaning and wasted gaps. Store accessories separately when possible. Label each position with a plain inventory code, not sensitive details. Review the layout twice a year, especially after acquiring or removing equipment. Standards such as UL 1037 emphasize the importance of secure container construction, but they do not guarantee practical capacity. The real limit is usable space, not the number printed on the door.
A 30-minute fire rating should shape your storage zones, not merely decorate the specification sheet. UL 72 tests fire resistance under controlled conditions. A 30-minute Class 350 rating limits interior temperatures to 350°F during the rated period. That limit matters for paper deeds, passports, photographs, and other heat-sensitive records. It does not guarantee survival in every house fire. NFPA’s Fire Loss in the United States During 2023 reported 1,388,500 fires and $22.1 billion in property damage. A brief exposure can become serious quickly. Time matters.
Place heat-sensitive items in a sealed, fire-resistant document pouch near the safe’s protected center. Keep them away from door gaps, hinges, and exterior walls. Use slim vertical dividers for unloaded, lawfully stored firearms and accessories. Leave a small retrieval lane. It prevents packed shelves from becoming a dangerous tangle. Store heavier items low, and keep documents above them, where spills are less likely. Avoid filling every inch. Keep space. Air gaps support inspection and faster access. Log the contents twice yearly. The imperfect part is uncomfortable: a 30-minute rating may not match the fire’s location, ventilation, or duration. Treat it as valuable time, not a promise.
UL 72 fire-resistance classes define the maximum interior temperature permitted during the rated fire exposure. Place heat-sensitive documents and digital media in the coolest, most insulated area of the safe, while less temperature-sensitive items can occupy the remaining zones. Actual performance depends on construction, installation, loading, and fire conditions.
How to Organize a Gun Safe for Maximum Storage Capacity
Rack Long Guns Upright With Muzzles Clear and Actions Unobstructed
Store long guns upright, not diagonally across the safe floor. Vertical placement preserves usable space and keeps muzzles pointed into a clear, protected area. Leave enough room around each muzzle to prevent contact with shelves, lighting fixtures, or stored accessories.
Actions must remain unobstructed. A compressed lever, bolt, or charging handle can create unnecessary pressure and complicate safe handling. Keep each firearm unloaded, with its action open when appropriate, and follow the manufacturer’s safety guidance. Separate ammunition storage may also support safer organization. The American Academy of Pediatrics recommends locked firearm storage and keeping ammunition secured separately. That advice matters most in homes with children or visitors.
A simple rack can create lanes instead of a tangled bundle. Place larger firearms at the rear, then shorter ones toward the front. Use soft dividers to prevent scratches, but avoid thick padding that steals vertical capacity. Pew Research Center reported in 2023 that roughly half of firearm owners keep all their firearms locked, showing that secure storage remains common but inconsistent. That gap deserves attention.
Check the muzzle path by eye. It is easy to miss a shelf edge. I have found that “maximum capacity” can become careless crowding. Leave a little breathing room for inspection, cleaning access, and controlled removal. Record each firearm’s position, too. A handwritten map seems imperfect, yet it can prevent hurried handling when the safe is full.
Use this planning table to arrange long guns vertically while preserving muzzle clearance, unobstructed actions, and usable access space. Measurements are practical planning values; always verify the safe's actual interior dimensions and the firearm manufacturer's storage guidance.
| Storage Zone | Recommended Internal Dimensions | Suggested Capacity | Organization Method | Clearance and Safety Requirement | Space-Efficiency Benefit |
|---|---|---|---|---|---|
| Long-gun rack bay | 12–14 W × 11–13 D × 52–58 H | 4–6 long guns | Place firearms upright in individual padded slots with the stocks fully seated. | Keep muzzles clear of the ceiling, rack hardware, and stored items. | Uses vertical height instead of stacking firearms horizontally. |
| Action-access zone | At least 2–3 D in front of the action | Applies to every rack position | Leave the receiver and operating area facing the aisle or open side of the rack. | Do not allow shelves, straps, cases, or neighboring items to obstruct the action. | Improves identification and removal without disturbing adjacent firearms. |
| Muzzle-clearance zone | 1–2 H above the muzzle | Applies to every long gun | Adjust rack height or position taller firearms in the center of the bay. | Maintain visible separation between each muzzle and the safe's upper interior. | Prevents wasted height caused by tilted or crosswise storage. |
| Wide-firearm position | 2.5–3.5 W per position | 2–4 wider firearms | Reserve end positions for firearms with larger stocks, optics, or accessories. | Avoid pressure against neighboring stocks, sights, or controls. | Reduces unusable gaps created when wide items are mixed into narrow slots. |
| Standard-firearm position | 2–2.5 W per position | 4–6 standard-width firearms | Group similarly sized firearms together and keep their stocks aligned. | Use padded dividers to prevent contact between finishes and metal parts. | Creates consistent spacing and makes empty positions easy to identify. |
| Optic and accessory clearance | 3–5 H above the receiver | One clearance allowance per optic-equipped firearm | Place taller equipment in positions with the greatest unobstructed height. | Prevent optics, handles, and controls from contacting shelves or the door. | Allows vertical storage without sacrificing an entire neighboring bay. |
| Door-panel storage | 2–4 D projection limit | Small accessories only | Store compact items such as documents, soft cases, or maintenance supplies in holders. | Confirm that door-mounted items do not touch actions, muzzles, or rack edges when closed. | Moves small items out of the main floor area and preserves rack width. |
| Lower storage shelf | 8–12 H clearance below rack base | 1 shelf for compact supplies | Use shallow bins for unloaded accessories, documentation, or protective materials. | Keep the shelf below the stocks and away from trigger areas and actions. | Uses otherwise unused lower volume without blocking upright firearms. |
| Aisle and retrieval space | 3–5 D in front of rack | One unobstructed access path | Keep the center of the safe free from loose cases and stacked equipment. | Remove firearms only when unloaded and follow all applicable safe-handling rules. | Maintains access to rear positions and reduces unnecessary rearrangement. |
| Unused-position reserve | 1 position per 6–10 stored firearms | Approximately 10–15% expansion space | Leave one open slot or adjustable divider position for future changes. | Do not compress firearms tightly to increase the stated capacity. | Preserves access and prevents a full rack from becoming difficult to use. |
A well-organized gun safe protects more than firearms. It also protects ammunition from heat, moisture, and careless handling. SAAMI guidance recommends keeping cartridges cool and dry in their original packaging. The packaging preserves caliber information, lot details, and handling instructions. Loose rounds create confusion and waste valuable space.
Place ammunition on a separate shelf or in a stable storage box inside the safe. Keep it away from the floor, exterior walls, and areas exposed to condensation. A small hygrometer can help you monitor humidity. Desiccant packs may help, but they need regular replacement. Never rely on them blindly. Check them.
Arrange boxes vertically, like books, when the packaging allows it. Leave a narrow air gap around the ammunition. This makes labels easier to read and improves access without creating a messy pile. Store heavier items below lighter boxes. Avoid stacking ammunition against firearms, tools, or sharp edges that could crush the cartons.
I have found that overpacking feels efficient at first. Later, it makes inspection difficult. That is a weakness worth admitting. Leave enough room to remove one box without disturbing everything else. Inspect the storage area periodically for dampness, damaged packaging, or corrosion. Follow local requirements and the firearm manufacturer’s storage instructions. Keep the safe locked, and restrict access to authorized adults.
A well-organized gun safe begins with compliance, not maximum capacity. Before adding shelves or racks, verify that the safe model appears on the current California Department of Justice approved list. California DOJ approval should specifically confirm compliance with the required 10-minute attack test. Do not rely only on a seller’s description. Check the official listing, model number, certification documents, and purchase records. Details matter.
After verification, measure the interior carefully. Store unloaded firearms according to the manufacturer’s instructions, with ammunition separated when required by local rules. Use vertical supports for long guns and padded holders for handguns. Keep frequently accessed items near the front, while rarely handled items can occupy higher or deeper spaces. Leave enough clearance to prevent scratched finishes and blocked hinges. Measure twice.
Capacity plans often fail because owners count empty air as usable space. I have found that a few inches of breathing room make inspection and cleaning easier. Still, I sometimes place too much emphasis on neat rows. Accessibility and safe handling matter more than a perfect arrangement. Avoid stacking heavy cases against the door. Keep keys or access controls secured, and review the safe’s condition regularly. Confirm that bolts, hinges, lighting, and interior fittings remain functional without weakening the tested structure. A crowded safe is not an efficient safe.
Measure each firearm from the stock or grip to the muzzle. Include attached accessories. Record every measurement in a simple table.
Capacity ratings often assume compact firearms with few accessories. Longer items, shelves, hinges, and locks reduce usable space. The printed number is not the real limit.
Place the tallest firearms at the rear or along the sides. Keep shorter firearms near the front. This creates clearer retrieval paths.
Use removable dividers to stop firearms from leaning into empty gaps. Slim vertical sections work well. Check that each item remains easy to remove.
Store accessories separately when practical. Attached items increase overall length and may cause scratches or crowding. Measurements can change after accessories are added.
Place documents inside a sealed, fire-resistant pouch near the safe’s protected center. Keep them away from door gaps, hinges, and exterior walls. Keep documents above heavier items.
It indicates tested protection for a limited period under controlled conditions. It does not guarantee survival during every house fire. Treat the rating as valuable time, not a promise.
Review the arrangement twice a year. Recheck it after adding or removing equipment. Log the contents and position codes. I may miss a measurement. That is why reviews matter.
How to organize a gun safe for maximum capacity begins with a careful inventory. Measure each firearm by overall length and compare those dimensions with the safe’s rated storage capacity before placing anything inside. Arrange long guns upright, keeping muzzles clear and actions unobstructed so items can be removed safely without shifting the rest. Adjustable supports or dividers can help use vertical space efficiently while preventing contact and scratches.
Create separate zones for heat-sensitive documents and valuables, giving preference to a safe that meets UL 72’s 30-minute fire rating. Store ammunition in a cool, dry area, ideally in its original packaging, and follow established safety guidance for handling and storage. Avoid overcrowding, since tight packing can hinder access and ventilation. Finally, confirm that the safe complies with applicable local requirements, including California’s DOJ 10-minute attack-test standard where relevant. A well-organized safe should maximize usable space while preserving security, accessibility, and responsible storage practices.
